

In this tutorial, we'll explain how to install Gitea on Ubuntu 22.04 and securing with SSL. The process includes with installation of Gitea, PostreSQL for database, Ngnix as reverse proxy, Certbot for SSL.
Gitea is easiest, fastest, and most painless way of setting up a self-hosted Git service. It has features like like bug tracking, code review, continuous integration, kanban boards, tickets, and wikis. It makes it easy for teams to collaborate and manage code projects.
Install Gitea on Ubuntu
Prerequisites:
- A Ubuntu installed dedicated server or cloud server.
- A root use access or normal use with administrative privileges.
- Git version >= 2.0. If Git is not install, use this command to install it
sudo apt install git -y
Let's start with the installation process.
1. Update The Server
Keep the server updated, it will update the respositories.
sudo apt update -y
2. Installing Nginx For Reverse Proxy
Nginx help us to access Gitea using our domain name. It works as a reverse proxy.
sudo apt install nginx -y
3. Configuring Firewall
We need to add HTTPS and HTTP port in firewall. If you are not using or disabled firewall, you can skip this step.
sudo ufw allow 80/tcp
sudo ufw allow 443/tcp
4. Installing PostreSQL For Database
We need to setup database before we install Gitea. We are covering PostgreSQL. It is widely-used in production. Gitea supports PostgreSQL (>= 12). Database instance can be on same machine as Gitea (local database setup), or on different machine (remote database).
First, we need to create repository file. It will help us to install latest version of PostgreSQL. Use following command to install it.
sudo sh -c 'echo "deb https://apt.postgresql.org/pub/repos/apt $(lsb_release -cs)-pgdg main" > /etc/apt/sources.list.d/pgdg.list'
Next, import the repository signing key, it help us to verify the installation.
wget --quiet -O - https://www.postgresql.org/media/keys/ACCC4CF8.asc | sudo apt-key add -
Let's update the package lists because we have created new repository file and it need to update to reflect it.
sudo apt-get update
Finally, execute following command to install PostgreSQL. Here you can mention specific version too. Like postgresql-14
sudo apt-get -y install postgresql
5. Configuring PostgreSQL
We need to configure and create database with user in PostgreSQL.
By default PostgreSQL uses md5 challenge-response encryption scheme for password authentication. It is not secured any more. We can replace it with SCRAM-SHA-256 scheme. Use your favorite editor and open postgresql.conf to make the changes.
sudo nano /etc/postgresql/16/main/postgresql.conf
Note: Replace the 16 version with your PostgreSQL version.
Find password_encryption and uncomment it. If it is not present or has different value, change the value or add following:
password_encryption = scram-sha-256
Now, login into PostgreSQL database console as a superuser, execute following command:
su -c "psql" - postgres
Let's create a user for our database with password.
CREATE ROLE gitea WITH LOGIN PASSWORD 'gitea';
Note: You are free to replace gitea with your choice username and password. Use strong password.
Now, create a database named giteadb. You can name anything you want. Here we have set charset UTF-8. We have specified libc collections with LC_COLLATE and LC_CTYPE parameter.
CREATE DATABASE giteadb WITH OWNER gitea TEMPLATE template0 ENCODING UTF8 LC_COLLATE 'en_US.UTF-8' LC_CTYPE 'en_US.UTF-8';
Now, edit pg_hba.conf and added following line. It will allow database user to access the database created above.
local giteadb gitea scram-sha-256
Note: Replace database name and user with your names.
Restart PostgreSQL to apply new authentication rules.
sudo systemctl restart postgresql
Verify the database connection using newly created database and user.
psql -U gitea -d giteadb
Note: Replace username and database name with your details.
You should be prompted to enter password for the database user, and connected to the database.
6. Installing Gitee by Binary
Let's begin with the installation process. Here are we are installing Gitea by binary method.
First, we need to download gitea file from official website using wget command:
wget -O gitea https://dl.gitea.com/gitea/1.21.4/gitea-1.21.4-linux-amd64
Make it executable.
chmod +x gitea
Next, create a user to run Gitea. Execute following command:
adduser \
   --system \
   --shell /bin/bash \
   --gecos 'Git Version Control' \
   --group \
   --disabled-password \
   --home /home/git \
   git
Next, create required directory structure:
mkdir -p /var/lib/gitea/{custom,data,log}
chown -R git:git /var/lib/gitea/
chmod -R 750 /var/lib/gitea/
mkdir /etc/gitea
chown root:git /etc/gitea
chmod 770 /etc/gitea
Important note: Here we are giving permission git user to /etc/gitea. This is the temporarily. We need it so that the web installer can write the configuration file. We can set read-only permission once we complete the installation process using following two commands:
chmod 750 /etc/gitea
chmod 640 /etc/gitea/app.ini
Next, copy the Gitea binary to a global location.
cp gitea /usr/local/bin/gitea
7. Create Gitea Linux Service
We can run Gitea as service, using either systemd. Create a gitea.service file in systemd using following command:
sudo nano /etc/systemd/system/gitea.service
Copy and paste following contents:
[Unit]
Description=Gitea (Git with a cup of tea)
After=syslog.target
After=network.target

Wants=postgresql.service
After=postgresql.service

RestartSec=2s
Type=simple
User=git
Group=git
WorkingDirectory=/var/lib/gitea/
ExecStart=/usr/local/bin/gitea web --config /etc/gitea/app.ini
Restart=always
Environment=USER=git HOME=/home/git GITEA_WORK_DIR=/var/lib/gitea

[Install]
WantedBy=multi-user.target
Important note: Here we have mention minimum configuration. If you want to look at the available option please visit official gitea.service documentation.
To reflect the changes, we need to reload systemd and start and enable the gitea.service. Execute set of following commands:
systemctl daemon-reload
systemctl enable gitea
systemctl start gitea
That'it we have completed with the task
8. Configuring Nginx
Now, let's start configuring Nginx as reverse proxy. Create a file named gitea.example.com.conf:
sudo nano /etc/nginx/sites-available/gitea.example.com.conf
Copy and paste following contents:
server {
    listen 80;
    server_name gitea.example.com;

    location / {
        client_max_body_size 512M;
        proxy_pass http://localhost:3000;
        proxy_set_header Connection $http_connection;
        proxy_set_header Upgrade $http_upgrade;
        proxy_set_header Host $host;
        proxy_set_header X-Real-IP $remote_addr;
        proxy_set_header X-Forwarded-For $proxy_add_x_forwarded_for;
        proxy_set_header X-Forwarded-Proto $scheme;
    }
}
Note: Replace gitea.example.com with your domain name.
We need to enable the configuration using following command:

sudo ln -s /etc/nginx/sites-available/gitea.hnxcloud.com.conf /etc/nginx/sites-enabled/gitea.hnxcloud.com.conf
Before we restart Nginx service, test it using following command:
nginx -t
If you not get any error, restart Nginx service:
sudo systemctl restart nginx
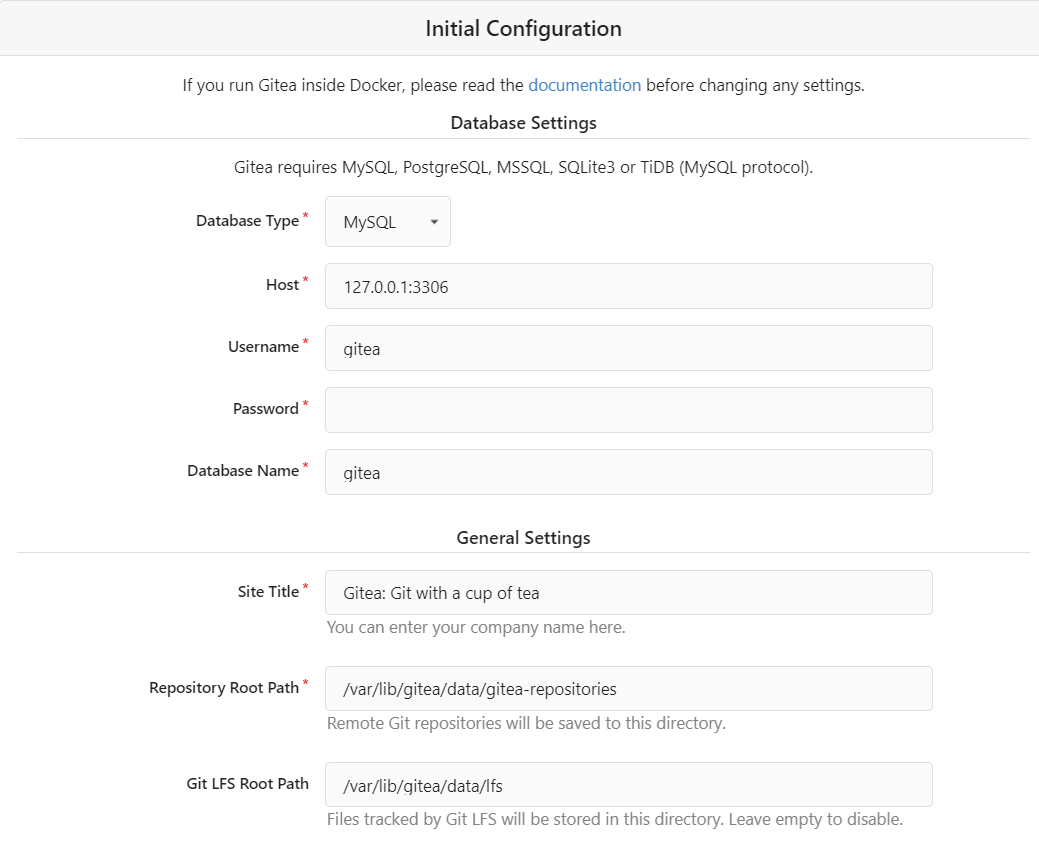
Navigate to the browser and access your domain name. You will get initial setup form. Enter database details, check other fields and fill as per your requirements. At the bottom, you will find administration creatation form. Enter your choice username execpt admin username and password.
9. Securing Gitea Web Interface
Finally, lets secure the Gitea web interface by Let's encrypt (Certbot) and access the web interface by HTTPS.
Frist install Certbot using following command:
sudo apt install certbot python3-certbot-nginx -y
Now obtain the SSL certificate using following command:
sudo certbot --nginx -d gitea.example.com
Note: Replace gitea.example.com with your domain name.
That's it. We have successfully completed the installation. We have seen how to install Gitea on Ubuntu 22.04. We have installed Nginx, PostgreSQL and Certbot.