

In this tutorial, we will explain how to install HarperDB on Linux. We are following production ready steps.
HarperDB is a data management solution. HarperDB combines database, application, and data streaming services into a single hyper-performant solution, delivering enterprise-quality apps at a lower cost and with less development effort.
HarperDB offers standards based interfaces that developers already know (REST, SQL, NoSQL, JSON). HarperDB is unique because it combines a high-performance database, user-built custom applications, and real-time data streaming into a single platform.
Prerequisites:
- Linux installed dedicated server or KVM VPS
- Normal or non-root user with administrative previliges.
-
An additional volume for storing HarperDB files is attached to the Linux instance.
1. Keep the server updated
For Ubuntu, Debian based:
apt update
For CentOS/AlmaLinux/Redhat based:
dnf update -y
2. Configure Data Volume
Before we begin to install HarperDB, we need to configure data volume to store all the data in that volume. Follow these steps:
First, find the device name of the additional volume we have reserved for HarperDB using lsblk command:
lsblk
Once you get the device name, create an ext4 filesystem on the volumne. Execute following command:
sudo mkfs.ext4 -L hdb_data /dev/ssdv1
Note: hdb_data is a label and ssdv1 is a device name. Your device name might be the different, use your device name here.
Next, create a new directory and mount the file system to that directory. Also set the correct permissions. Execute following command:
mkdir /home/block/hdb
sudo mount -t ext4 /dev/ssdv1 /home/block/hdb
sudo chown -R block:block /home/block/hdb
sudo chmod 775 /home/block/hdb
Note: Replace block username with your username.
That's it. Finally, add the new file system in the fstab so that the system will get know about the newly created file system and the system will mount it. Execute following command:
echo "LABEL=hdb_data /home/block/hdb ext4 defaults,noatime 0 1" | sudo tee -a /etc/fstab
Note: In the LABEL if you assigned different label, you should mention that here. Replace block with you username
(Optionally) Configure directory without disk volume
If you cannot able to get/add new disk volume, you can simply create a new directory set the permission and use that directory. It will work as the same. it is not recommended for production but anyway it will work.
mkdir /home/block/hdb
sudo chown -R block:block /home/block/hdb
sudo chmod 775 /home/block/hdb
3. Install Dependencies
Before we install the dependencies, we need to increase the open file limits for the user.
Execute following 2 commands:
echo "block soft nofile 500000" | sudo tee -a /etc/security/limits.conf
echo "block hard nofile 1000000" | sudo tee -a /etc/security/limits.conf
Note: Replace block with your username.
In order install HarperDB, we need Nodejs 14 or above version. Execute following commands:
Using Ubuntu
curl -fsSL https://deb.nodesource.com/setup_20.x | sudo -E bash - &&\
sudo apt-get install -y nodejs
Using Redhat
curl -fsSL https://rpm.nodesource.com/setup_20.x | sudo bash -
sudo dnf install -y nodejs
4. Install and start HarperDB
Finally, let's install and start HarperDB. Use npm command to install HarperDB.
npm install -g harperdb
To start the HarperDB, we can use minimal configuration or some commonly used additional configurations. For more information visit HarperDB official documentation.
With minimal configuration:
harperdb start \
  --TC_AGREEMENT "yes" \
  --ROOTPATH "/home/block/hdb" \
  --OPERATIONSAPI_NETWORK_PORT "9925" \
  --HDB_ADMIN_USERNAME "HDB_ADMIN" \
  --HDB_ADMIN_PASSWORD "password"
With additional configuration:
harperdb start \
  --TC_AGREEMENT "yes" \
  --ROOTPATH "/home/block/hdb" \
  --OPERATIONSAPI_NETWORK_PORT "9925" \
  --HDB_ADMIN_USERNAME "HDB_ADMIN" \
  --HDB_ADMIN_PASSWORD "password" \
  --HTTP_SECUREPORT "9926" \
  --CLUSTERING_ENABLED "true" \
  --CLUSTERING_USER "cluster_user" \
  --CLUSTERING_PASSWORD "password" \
  --CLUSTERING_NODENAME "hdb1"
Note:
- Replace block with your username
- Replace
HDB_ADMIN_USERNAMEwith your choice admin name andHDB_ADMIN_PASSWORDwith your choice secure password. - In case you want to use different directory your can replace
ROOTPATH.
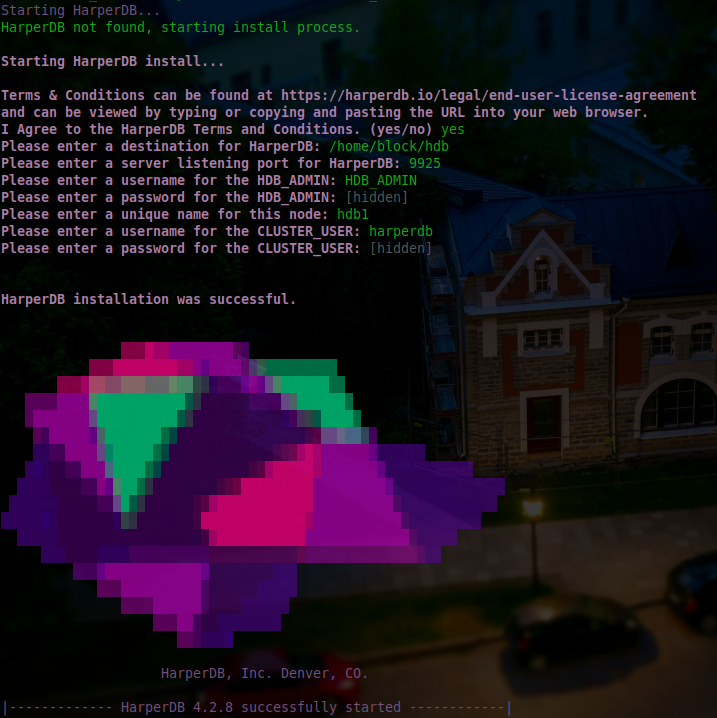
Output:
5. Create HarperDB service
HarperDB will automatically start after installation. If we wish HarperDB to start when the OS boots, we need to create a systemd script.
Create a file in /etc/systemd/system/ named harperdb.service using following command:
vi /etc/systemd/system/harperdb.service
and copy and paste following contents:
[Unit]
Description=HarperDB

[Service]
Type=simple
Restart=always
User=ubuntu
Group=ubuntu
WorkingDirectory=/home/ubuntu
ExecStart=/bin/bash -c 'PATH="/home/ubuntu/.nvm/versions/node/v18.15.0/bin:$PATH"; harperdb'

[Install]
WantedBy=multi-user.target
Note: Replace block with your username. In case you have different directory you can replace WorkingDirectory.
Finally, reload the daemon service to refect the changes and start and enable the harperdb.service.
sudo systemctl daemon-reload
sudo systemctl start harperdb && systemctl enable harperdb
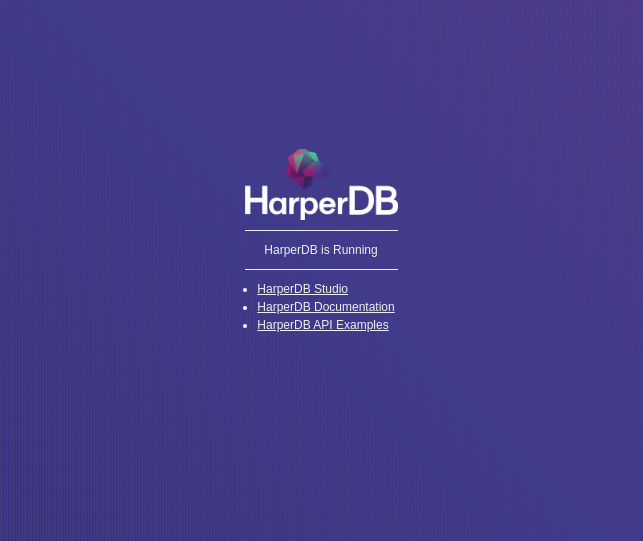
6. Verify the installation
Navigate to your browser and access:
http://[server IP]:9925
You will see the following screen:
That's it. We have successfully seen how to install HarperDB on Linux.