

In this tutorial, we'll discuss about installing Snipe IT with Nginx on Ubuntu 22.04 and securing with Let's Encrypt SSL certificate. Snipe-IT is an open-source asset management system that helps organization manage their IT assets efficiently.
It provides a centralized platform for managing hardware, software, and other assets throughout their lifecycle, from procurement to retirement. Snipe-IT simplifies asset management processes, improves visibility into asset usage and status, and helps organizations optimize their IT investments while ensuring compliance and security.
Prerequisites:
- Ubuntu 20.04 LTS (or higher) dedicated server
- A user account with sudo privileges
- Basic knowledge of the Linux command line
Step 1: Update System Packages
Before installing any new software, update your system's package repository and installed packages
sudo apt update
sudo apt upgrade
Step 2: Install Required Packages
Install the necessary packages required for Snipe-IT and PHP-FPM:
apt install -y git zip php-fpm php-json php-mysql php-mbstring php-tokenizer php-curl php-ldap php-zip php-bcmath php-xml php-common php-gd php-imagick php-json php-curl php-pear unzip
Step 3: Install Composer
Composer is a dependency manager for PHP. Install Composer globally and move composer.phar to /usr/local/bin/composer:
curl -sS https://getcomposer.org/installer | php
sudo mv composer.phar /usr/local/bin/composer
Step 4. Install MariaDB
sudo apt install mariadb-server -y
Secure MariaDB Installation (Optional but Recommended)
Run the mysql_secure_installation script to improve the security of your MariaDB installation:
sudo mysql_secure_installation
Follow the prompts to set a root password, remove anonymous users, disallow root login remotely, remove the test database, and reload privileges.
Log in to the MariaDB shell as the root user:
sudo mysql -u root -p
Enter the root password when prompted.
Create a Database and User for Snipe-IT
Run the following SQL commands to create a database and a user for Snipe-IT. Replace snipeit_db with your desired database name, snipeit_user with your desired username, and password with your desired password:
CREATE DATABASE snipeit_db CHARACTER SET utf8mb4 COLLATE utf8mb4_unicode_ci;
CREATE USER 'snipeit_user'@'localhost' IDENTIFIED BY 'password';
GRANT ALL PRIVILEGES ON snipeit_db.* TO 'snipeit_user'@'localhost';
FLUSH PRIVILEGES;
exit
Step 5. Install Snipe-IT
Clone the Snipe-IT repository from GitHub to your server:
cd /var/www
sudo git clone https://github.com/snipe/snipe-it.git
Change directory to the Snipe-IT folder:
cd snipe-it
Copy the .env.example file to .env:
cp .env.example .env
Edit the .env file and configure your database settings:
nano .env
Replace the following variables with your MariaDB database details:
DB_DATABASE=snipeit
DB_USERNAME=username
DB_PASSWORD=password
Change locate these settings. Set APP_URL to your server’s Fully Qualified Domain Name, or it’s public IP address. If you use a time zone other than UTC, change the timezone to a PHP-supported timezone, and enclose it in single quotes.
APP_URL=example.com
APP_TIMEZONE='America/New_York'
Save and close the file. Set the correct ownership and permission for the Snipe-IT data directory.
chown -R www-data:www-data /var/www/snipe-it
chmod -R 755 /var/www/snipe-it
Install the Snipe-IT dependencies with Composer. You’ll receive a warning not to run this as root on each command. It’s okay to continue as root for the Snipe-IT install, so type yes and hit ENTER.
composer update  --no-plugins --no-scripts
composer install --no-dev --prefer-source --no-plugins --no-scripts
Once the Composer finishes running, generate a Laravel APP_Key value in the /var/www/snipe-it/.env configuration file you created earlier. Type yes and hit ENTER when prompted to continue.
php artisan key:generate
Step 7. Configure Nginx
Create a new server block configuration file for Snipe-IT:
sudo nano /etc/nginx/sites-available/snipe.example.com
Add the following configuration:
server {
    listen 80;
    server_name snipe.example.com;
    root /var/www/snipe-it/public;

    index index.php index.html index.htm;

    location / {
        try_files $uri $uri/ /index.php?$query_string;
    }

    location ~ \.php$ {
        include snippets/fastcgi-php.conf;
        fastcgi_pass unix:/var/run/php/php8.1-fpm.sock; # Adjust PHP version if necessary
    }

    location ~ /\.ht {
        deny all;
    }
}
Enable the new server block and restart Nginx:
sudo ln -s /etc/nginx/sites-available/snipe.example.com /etc/nginx/sites-enabled/
Verify the NGINX configuration for any syntax errors:
sudo nginx -t
If there are no errors, reload NGINX to apply the changes:
sudo systemctl restart nginx
Step 8: Adjust Firewall Settings (if applicable)
If you're using a firewall, such as UFW, make sure to allow traffic on port 80:
sudo ufw allow 'Nginx Full'
Step 9: Configure HTTPS
For added security, consider configuring HTTPS for your Grafana instance. You'll need an SSL certificate for your domain. You can obtain a free SSL certificate from Let's Encrypt using Certbot.
sudo apt install certbot python3-certbot-nginx
Then run the following command to obtain and install the SSL certificate:
sudo certbot --nginx -d snipe.example.com
Follow the prompts to configure HTTPS with Certbot.
After configuring HTTPS, restart NGINX to apply the changes:
sudo systemctl restart nginx
Now your Snipe-IT should be accessible via HTTPS.
Step 10: Complete Installation via Web Interface
Open your web browser and navigate to your domain name. You should see the Snipe-IT setup page. Follow the on-screen instructions to complete the installation:
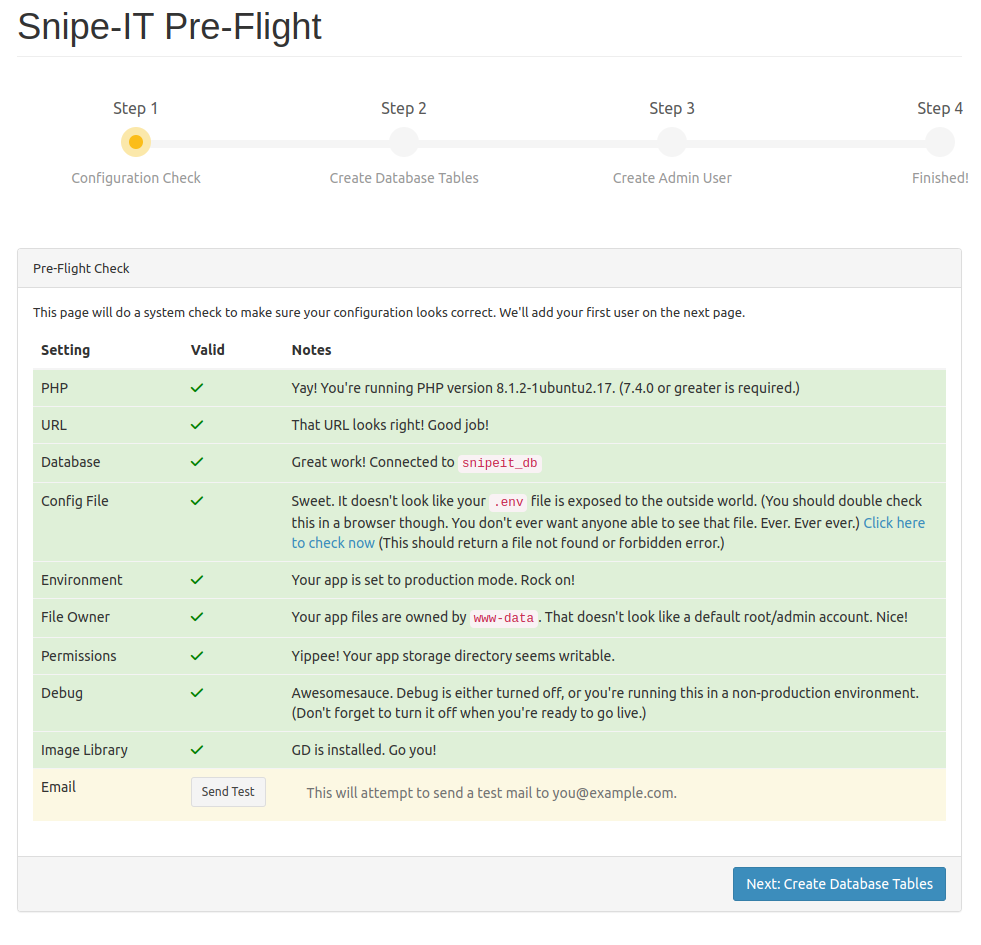
- Create an administrator account.
- Configure email settings (optional).
- Configure optional settings as per your requirements.
Congratulations! We have discussed about installing Snipe IT with Nginx on Ubuntu 22.04 abd secured it with Let's Encrypt SSL. You can now log in to the Snipe-IT admin panel using the credentials you created during the installation process.